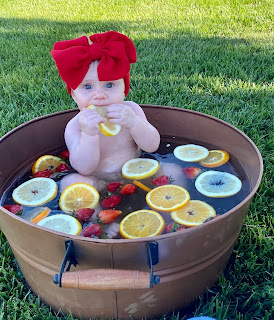
DIY Milk Bath Photoshoot
Ever since having a baby, I’ve been anxiously waiting to do a milk bath photoshoot because they are so.dang.cute.! I looked on Pinterest to get some ideas of what kinds of fruit to include and photo tips. I read some good pointers, but wanted to give more details than what I found online.
After doing the photoshoot, I’ve come up with the following tips on how to DIY milk bath photoshoot:
1. Use hose water to fill bucket a couple inches and then use hot water from faucet in a watering can (or boil water in a kettle) to give warm bath water for your baby. If adding milk (I would use breastmilk), be sure to add last so you can see how milky you want the water (I did not add milk to my bath because I simply forgot - mom brain).
2. I used the following amount of fruit in the pictures below:
4. Slice your lemons and/or oranges to medium thickness. I’d you slice too thin, the seeds fall out in the bath, the pulp sheds in the water and they won’t float.
5. Be sure to have your camera ready before you place the babies in the water! Babies immediately put the fruit in their mouths when you place them in the bath and you’ll want your camera ready to get those taste action shots. Also, try Portrait mode if you have an iPhone!!
6. If you have a girl, put the bow on just before getting in the bath. If your baby is like mine, she might try to pull it off before you can catch a good photo.
7. And voila! Your baby will try to eat the fruit right away! Capture those pictures of their faces when they try a tart piece of lemon or a juicy slice of orange!
You’re making memories on a budget that can get printed later.
After doing the photoshoot, I’ve come up with the following tips on how to DIY milk bath photoshoot:
1. Use hose water to fill bucket a couple inches and then use hot water from faucet in a watering can (or boil water in a kettle) to give warm bath water for your baby. If adding milk (I would use breastmilk), be sure to add last so you can see how milky you want the water (I did not add milk to my bath because I simply forgot - mom brain).
2. I used the following amount of fruit in the pictures below:
- (2) Lemons - washed & medium sliced
- (1.5) Oranges - washed & medium sliced
- (1) 16oz container Strawberries - washed with tops left on them
4. Slice your lemons and/or oranges to medium thickness. I’d you slice too thin, the seeds fall out in the bath, the pulp sheds in the water and they won’t float.
5. Be sure to have your camera ready before you place the babies in the water! Babies immediately put the fruit in their mouths when you place them in the bath and you’ll want your camera ready to get those taste action shots. Also, try Portrait mode if you have an iPhone!!
6. If you have a girl, put the bow on just before getting in the bath. If your baby is like mine, she might try to pull it off before you can catch a good photo.
7. And voila! Your baby will try to eat the fruit right away! Capture those pictures of their faces when they try a tart piece of lemon or a juicy slice of orange!
You’re making memories on a budget that can get printed later.


Comments
Post a Comment